April 24, 2014

Garden progress in April

The area surrounding the garden shed took a lot of work, but finally it is presentable enough to post some before and after photos. The shed itself looked more like some hillbilly's shack than anything else! So, you may ask, what exactly needed to be done here?
  • Paint the fence, shed and house
  • Install brick edging around the lawn
  • Remove every existing plant except the Palm tree
  • Clear invasive grass from flower beds
  • Plant a hedge against the fence
  • Plant a tree in the middle of the lawn

Before: February 2013 - the day we bought the house.

After: April 2014

Before: February 2013 - the previous folks did not seem to mind having grass in their flower beds.

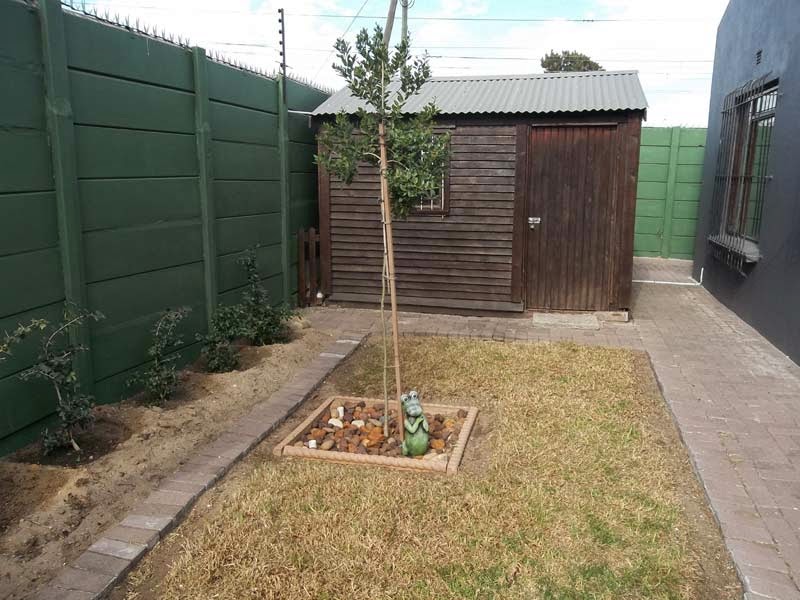
After: April 2014 - view showing the tree I planted (Apodytes dimidiata, the White Pear). The tree grew to this size in just 1 year so I am impressed with its progress to date.

Before: February 2013 - looking from the shed to the neighbor's house.

During: August 2013 - view just after I finished planting the new hedge.

After: April 2014 - view from the shed, showing the hedge and dramatically taller White Pear tree.

April 15, 2014

The new Fynbos bed

At the side of our house is a 2.5 meter wide paved area that has been there ever since the house was built in 1994. The paving consists of pale grey concrete slabs with cracked cement between. I'm not a big fan of paving, especially not ugly paving, so it was time to dig up these stained and uneven old slabs and create a new flower bed to house my fynbos plants.


The concrete paving was surprisingly easy to get rid of. All you need is a hammer, chisel and shovel. First chip away the cement between pavers using the hamer and chisel and then lift out the slab by levering a shovel into the gap. This is a very easy way to remove a slab without damaging the surrounding paving. After that you can simply pop up the remaining slabs one by one with the shovel.


I dug over the entire bed, removing rocks, roots from the neigbor's tree and random junk that the original builders left on-site and simply paved over. Then came my favorite gardening activity - planting! I decided to use the newly created bed only for indigenous plants, preferably fynbos. I also added a False Olive Tree (Buddleja saligna). There are some power lines visible on the other side of our fence, so the tree was positioned in such a way that it will block those lines when viewed from our front door and living room window. Buddleja saligna is supposed to grow at the rate of 1 meter per year, so this should happen within the next 3 years or so.


Several of the plants I planted out were grown from cuttings. The rest were purchased from the Harold Porter Botanical Gardens in Betty's Bay. They have a fantastic range of fynbos plants and prices are a lot lower at Harold Porter than at Kirstenbosch. I didn't photograph all of the plants, but the ones in this photo are:
  • Athanasia crithmifolia
  • Cliffortia ferruginea
  • Euryops abrotanifolius
  • Euryops thunbergii? (Not too sure about this one - this was a cutting from the wild)
  • Felicia filifolia
  • Helichrysum argyrophyllum
  • Hermannia pinnata
  • Hymenolepis parviflora
  • Leonotis leonorus (replaced at the last minute with the Buddleja saligna tree)
  • Osteospermum fruticosum
  • Pelargonium cucullatum
My wife is not too crazy about fynbos, so we reached a compromise: I will only plant indigenous plants in this bed now, but if something dies, I will replace it with conventional garden plants (whether they are indigenous or not).

The plants are so small as to be practially invisible on the photos, but after a year or two it should look a lot better. I will post some "after" photos once they are established and there is more to see.

April 8, 2014

Featured Plant: Coleonema Album

coleonema album

Coleonema album is also known as "Cape May" or "White Confetti Bush".

This is a compact and bushy evergreen shrub that grows from 1.5 to 2 meters high and wide. It branches from the bottom and has fragrant, needle-like leaves. The small white flowers are only 6mm wide, but appear in clusters that cover the entire bush as if it was strewn with confetti. Flowers appear during Winter and Spring and attract bees and butterflies.

Coleonema album is indigenous and grows along the coast, all the way from Saldanha in the North down to Cape Town and the slopes of Table Mountain, then east to Bredasdorp. This plant is highly recommended for coastal gardens as it tolerates the coastal winds and sandy soils very well. It also grows well in containers.

The best soil for growing this shrub is a well drained, acid soil with plenty of compost. Coleonema bushes should be planted close together and mulched heavily to keep the soil and roots cool. Never let them dry out completely during summer while small, although they survive drought once established. (Note that this plant is susceptible to root rot fungus if over-watered during summer, so only water when necessary.)

Coleonema album is widely available at most garden centers and the best time to plant it is during Autumn, Winter, or early Spring. It can be grown from seed (sown in Autumn), or from cuttings (taken in Autumn or Spring).

Always plant this shrub in full sun - although it can grow in partial shade, it will not flower as prolifically.

April 2, 2014

April is the best time for planting in Cape Town

For most plants, Autumn is by far the best time for planting in Cape Town. The dry, hot summer weather will be safely in the past, while the soil temperatures will still be high enough for new root growth, particularly in April. This will give plants time to grow new roots and establish themselves before Summer arrives again. Since the plant will focus on its roots in Autumn, when Spring comes it will be ready for a flush of new growth and flowers.

Plants require the most water during the first 4 months or so after they've been planted - so let nature do the watering for you when the winter rains arrive! You would need to water your new plants a lot more if you planted them in Spring or Summer.

Never, ever, ever plant something in Summer. Cape Town's heat, wind and dryness during Summer makes it the worst possible time for plants to be planted out in the garden. (Not to mention how hot and sweaty you would be yourself!)

* As with most things, there are always exceptions - some annual 6-packs may still be planted in Spring, while planting times for bulbs will depend on the individual bulb species. When a plant is featured on this blog it will include details on the best time to plant it.

April 1, 2014

Featured Plant: Drosanthemum speciosum

Drosanthemum speciosum (Berg Vygie) Drosanthemum speciosum (Berg Vygie)

Drosanthemum speciosum has many common names and is also known as: 'Scarlet Dewflower', 'Red Bush Vygie' or 'Berg Vygie'.

This is a very fast-growing, evergreen small shrub or groundcover that grows in a low mound about 60 cm wide. The flowers are roughly 5cm wide and red with a white center. Flowers appear in Spring (October in my garden) and close in the evening or cloudy weather.

After 3 to 5 years the plant will become a bit woody and scruffy and should then be replaced. Fortunately it is easy to grow yourself, from cuttings (taken in Autumn) or from seed (also in Autumn). It is also commonly sold in 6-packs at the larger garden centers. The best time to plant it out in the garden is during Autumn, before the winter rains start.

Plant Drosanthemum speciosum in full sun to get the maximum amount of flowers, although it will also tolerate some light shade. This is a very drought tolerant species and only needs water once every 3 weeks in Summer once established. In fact, over-watering may cause the plant to rot, so you should keep it dry during the summer months. The soil should be well-drained, preferably sand or loam. As this plant grows naturally in the Worcester and Robertson areas, which are even hotter and drier than Cape Town, this plant grows very well in the milder conditions found in Cape Town.